Slow-Cooked Beefy Bliss: Hearty Vegetable Soup for the Soul

Ingredients:

- 1 tablespoon of extra virgin olive oil
- 1 pound of boneless chuck roast or beef stew meat, cut into mouthwatering 1-inch cubes
- 2 teaspoons of kosher salt, divided for a balanced flavor
- A pinch of black pepper to add a little zing
- 3-4 cups of low-sodium beef broth, because flavor is the name of the game
- 1 small yellow onion, diced to perfection
- 2 cloves of garlic, minced to release their aromatic magic
- 4 large carrots, peeled and finely chopped
- 2 Yukon gold potatoes, peeled and diced for that hearty goodness
- 2 parsnips, peeled and diced, adding a touch of earthiness
- 2 ribs of celery, diced for that delightful crunch
- 1 can (14.5 ounces) of diced tomatoes, for a burst of freshness
- 1 can (8 ounces) of tomato sauce
- 3 tablespoons of tomato paste, because tomato goodness is life
- 1 tablespoon of Worcestershire sauce, for a hint of umami
- 1 teaspoon of dried oregano, because herbs make everything better
- ½ teaspoon of smoked paprika, adding a touch of smokiness
- ½ teaspoon of granulated sugar, just a pinch to balance the flavors
- 1 cup of peas, fresh or frozen (no need to thaw), for a pop of color
- Chopped fresh parsley (optional but oh-so-pretty) for the finishing touch
How to Make It:
Get ready to embark on a flavor-packed journey with our Crockpot Beef Vegetable Soup. This isn't just a recipe; it's a warm embrace, a comforting hug from your slow cooker. Perfectly seasoned chunks of beef nestled amongst an array of vibrant vegetables - it's like a symphony of tastes and textures that will make your taste buds dance.

Cooking Symphony:

1. Heat up 1 tablespoon of extra virgin olive oil in a large skillet over medium-high heat. Add the beef, sprinkle with 1 teaspoon of salt, and let it sizzle, turning occasionally, until it's gorgeously browned on all sides. This is where flavor starts!
2. As the beef dances in the skillet, take 3 minutes to sauté the onion until it's soft and beginning to release its sweet aroma. Stir in the garlic for just 30 seconds; we don't want it to overstay its welcome. Now, add about 1/2 cup of beef broth to the party and scrape up those irresistible browned bits from the bottom of the pan - that's pure flavor gold!
3. Transfer this mouthwatering mixture to your trusty 6-quart slow cooker, where all the magic will happen.
4. Into the slow cooker go the carrots, potatoes, parsnips, celery, diced tomatoes, tomato sauce, tomato paste, Worcestershire sauce, oregano, paprika, sugar, 2 1/2 cups of beef broth, and the remaining 1 teaspoon of salt. Cover it up and let the slow cooker work its magic for 8 hours on low, turning this medley into a tender and flavorful symphony.
5. Just before serving, stir in the peas and let them warm through. If you prefer a thinner consistency, add the remaining 1 cup of beef broth until it's just right.
6. The final act: ladle this masterpiece into bowls, sprinkle with fresh parsley if you're feeling fancy, and enjoy a bowlful of warm, hearty delight. This isn't just soup; it's a symphony of flavors that will warm your heart and nourish your soul.

A Slow-Cooker Triumph:

So, let your slow cooker take center stage, and savor every spoonful of this soul-soothing Crockpot Beef Vegetable Soup. It's not just a meal; it's a masterpiece. Enjoy!

Mediterranean Magic: Shrimp Delight in a Pan

Ingredients:

- 1 pound of large, peeled, and deveined shrimp (you can leave those tails on or off, your choice)
- ¾ teaspoon of kosher salt (divided for a perfect balance)
- ½ teaspoon of ground black pepper (divided for an extra kick)
- 2 tablespoons of extra virgin olive oil
- 1 small red onion, finely chopped
- 2 cloves of garlic, minced to release their flavorful aroma
- 1 can (14.5 ounces) of fire-roasted diced tomatoes in their juicy glory
- 1 teaspoon of dried oregano, for that Mediterranean magic
- ¼ teaspoon of red pepper flakes, because a little heat is oh-so-nice
- 1 teaspoon of honey, a touch of sweetness to balance the flavors
- 1 teaspoon of red wine vinegar, for that Mediterranean zing
- 1 can (14 ounces) of artichoke hearts, drained and quartered
- ½ cup of pitted Kalamata olives, for that irresistible Mediterranean brine
- ¾ cup of crumbled feta cheese, because life's better with cheese
- 2 tablespoons of chopped fresh parsley, for that fresh finishing touch
- 2 tablespoons of fresh lemon juice, squeezed from about half a medium lemon
- For serving: rice, whole wheat couscous, crusty bread, pasta (optional but highly recommended)
How to Make It:
Are you ready to embark on a culinary journey to the sunny shores of the Mediterranean? Look no further than our Mediterranean Shrimp recipe! This dish is like a vacation for your taste buds, combining the finest flavors of the Mediterranean diet in one delectable, one-pan delight.

Savor the Mediterranean Symphony:

1. Preheat your oven to a toasty 400 degrees F and place a rack in the center, because we're about to create some magic.
2. Now, let's give those shrimp a little love. Pat them dry, place them in a mixing bowl, and sprinkle with ½ teaspoon of salt and ¼ teaspoon of black pepper. Give them a toss and let them soak up those flavors.
3. In a large, ovenproof skillet over medium heat, heat up the olive oil. Add the finely chopped onion, then sprinkle with the remaining ¼ teaspoon of salt and ¼ teaspoon of black pepper. Let those onions dance in the pan, stirring occasionally, until they turn soft and lovely, about 5 minutes. Keep an eye on them to ensure they don't brown.
4. Now, add the garlic and let it work its aromatic magic for about 30 seconds.
5. It's time to bring in the Mediterranean vibes! Add the diced tomatoes, dried oregano, and red pepper flakes. Reduce the heat to medium-low and let this delightful mixture simmer gently for 10 minutes. Now, stir in the red wine vinegar and honey for that perfect Mediterranean balance.
6. Here comes the artichokes and olives, scattered over the top. Now, gently arrange those perfectly seasoned shrimp on top in a single layer. Finish it off with a sprinkle of crumbled feta, because, well, everything's better with cheese.
7. Pop this flavor-filled masterpiece into your preheated oven and let it bake for 10 to 12 minutes. You'll know it's ready when the tomatoes are bubbling, the cheese gets that lovely golden touch, and the shrimp are cooked through.
8. A final touch of Mediterranean freshness: squeeze that lemon juice over the top and sprinkle with chopped parsley.

Time to Indulge:

This Mediterranean Shrimp dish isn't just food; it's a Mediterranean vacation on a plate. Serve it hot, savor every bite, and transport yourself to the sunny shores of the Mediterranean. Buon appetito!

Mexican Stuffed Peppers: A Fiesta of Flavor

Ingredients:

- 4 large, colorful bell peppers (because who said food can't be fun?)
- 2 teaspoons of extra virgin olive oil (for that sizzle)
- 1 pound of ground chicken (or turkey if you prefer)
- 1 teaspoon of ground chili powder (get ready for some heat)
- 1 teaspoon of ground cumin (because cumin makes everything better)
- 1 teaspoon of garlic powder (for that irresistible aroma)
- ½ teaspoon of kosher salt (just the right pinch)
- ¼ teaspoon of black pepper (a little kick never hurt)
- 1 can of fire-roasted diced tomatoes (14 ounces), with all those flavorful juices
- 1 ½ cups of cooked brown rice (or mix it up with quinoa or cauliflower rice)
- 1 ¼ cups of shredded cheese (Monterey Jack, pepper jack, cheddar, or your cheesy choice), divided for ultimate cheesiness
How to Make It:
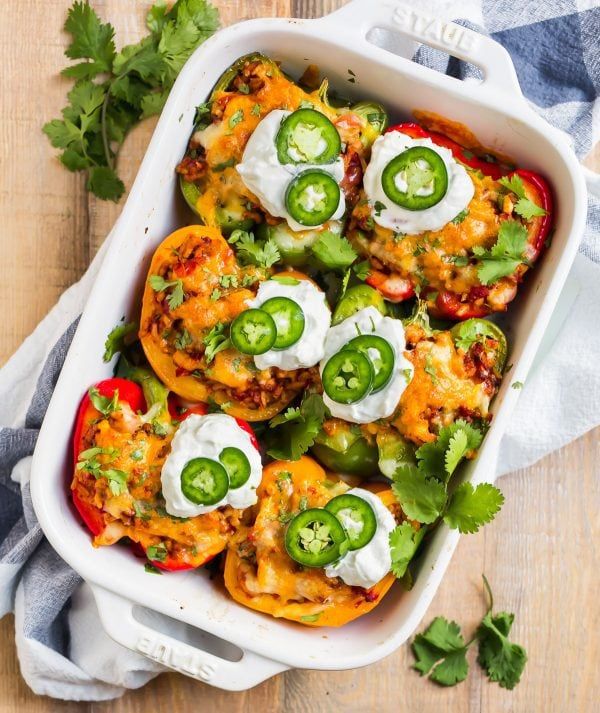
Buckle up, because we're about to embark on a flavor-packed fiesta with these Mexican Stuffed Peppers! These vibrant bell peppers are more than just colorful; they're a wholesome explosion of Mexican-spiced chicken, cheese, and rice that'll leave your taste buds doing the salsa.

Let's Get This Fiesta Started:

1. Preheat your oven to a toasty 375 degrees F. Grab that trusty 9x13-inch baking dish and give it a light coat of nonstick spray, because we're about to create a masterpiece.
2. Slice those bell peppers in half, creating colorful vessels for our flavorful filling. Remove the seeds and membranes, then arrange them cut side up in your prepared baking dish. They're ready to be stuffed with flavor!
3. Heat up the olive oil in a large, nonstick skillet over medium-high heat. Add the ground chicken, along with the chili powder, cumin, garlic powder, salt, and pepper. Let this aromatic medley cook, breaking apart the meat, until the chicken becomes beautifully browned and perfectly cooked through, about 4 minutes. Any excess liquid? Say goodbye and drain it off.
4. Pour in the can of diced tomatoes, complete with their juicy goodness, and let it all simmer together for a minute. Now, remove the pan from the heat, and it's time to work your magic. Stir in the cooked rice (whether it's brown, quinoa, or cauliflower), and let these ingredients mingle. Add ¾ cup of that glorious shredded cheese into the mix too, because who can resist cheese?
5. Mound this flavorful filling inside those waiting bell peppers, and don't be shy with it. Top it all off with the remaining cheese, because we're going all-in on the cheesiness.
6. Now, to add a little magic to the oven, pour a touch of water into the pan, just enough to barely cover the bottom. Bake these beauties, uncovered, for 25 to 35 minutes. How do you know they're ready? When the peppers are tender, and the cheese is gloriously melted and golden.
7. Time to get creative! Top your Mexican Stuffed Peppers with all your favorite fixings. Salsa, sour cream, guacamole—the choice is yours. Enjoy these hot and savor every delicious bite of this flavorful fiesta!

Viva la fiesta, amigos! 🎉

Zucchini Pizza Boats: Sail into Flavor Paradise

Ingredients:

- 4 medium-sized zucchinis (our trusty boats)
- ¼ teaspoon of kosher salt (to sprinkle our culinary sea)
- 1 cup of pizza sauce (or any prepared marinara sauce you fancy)
- 1 ¼ cups of shredded mozzarella cheese (or mix things up with provolone)
- 1 teaspoon of Italian seasoning (for that Mediterranean flair)
- ¼ - ½ teaspoon of crushed red pepper flakes (if you're feeling adventurous)
- ¼ cup of mini pepperoni (or go for mini turkey pepperoni or regular-size pepperoni, sliced into quarters)
- 2 teaspoons of freshly ground Parmesan (because Parmesan makes everything better)
- 2 teaspoons of chopped fresh basil, thyme, or any other fresh herbs you love
How to Make It:
Ahoy, fellow food adventurers! Today, we're setting sail on a culinary voyage to Flavor Paradise with these Zucchini Pizza Boats. They're here to prove that you don't need a carb-heavy crust to enjoy all the sensational flavors of pizza.

Let's Set Sail on This Flavor Journey:

1. First things first, let's make sure our oven is up to the task. Preheat it to a toasty 375 degrees F. Grab a trusty rimmed baking sheet or a 9x13-inch baking dish and give it a little love with nonstick spray. Our zucchini boats need a safe place to dock!
2. It's time to prepare our culinary vessels. Slice each zucchini lengthwise, creating perfect boats. With a small spoon or a melon baller, gently scoop out the center zucchini flesh and pulp, leaving a border of about 1/3 inch on all sides. Think of it as carving out our boat's interior. Now, arrange these zucchini shells on the baking sheet, like a fleet ready for flavor adventures. Sprinkle the insides of our zucchini boats with a pinch of salt to awaken those flavors.
3. Ahoy, pizza lovers! Let's fill these boats with pizza sauce, our marinara seas if you will. Divide it evenly among the zucchini shells. You might need a tad more or less, depending on your zucchini's size. Fill them generously, but don't go overboard—leave a little room at the top.
4. Time to deck these boats with cheese! Sprinkle mozzarella all over, ensuring every bite will be cheesy perfection. Now, let's add some Italian seasoning and red pepper flakes for that extra pizzazz. Scatter on the pepperoni like it's treasure and any other toppings you desire. Last but not least, sprinkle with Parmesan, because, well, why not?
5. Our flavor voyage is about to reach its destination. Bake these zucchini pizza boats for 15 to 20 minutes, just until the cheese is hot, bubbly, and the zucchini is tender. Feeling adventurous? Switch the oven to broil for an extra 2 to 3 minutes until the cheese turns gloriously golden.
6. As our flavor ships dock in Flavor Paradise, sprinkle them with fresh basil or any herbs you adore. Serve immediately and enjoy your culinary journey into the world of Zucchini Pizza Boats. Bon appétit!

Set sail, flavor explorer! ⛵🍕

Creamy Gluten-Free Tomato Pasta: A Comfort Food Hug Without Gluten

Ingredients:

- 3 tablespoons of olive oil (divided)
- ½ cup of diced white onion
- 1 teaspoon of minced garlic (because who doesn't love garlic?)
- 10 ounces of gluten-free pasta (your passport to pasta happiness)
- 8 ounces of canned Italian stewed tomatoes (let's get saucy)
- ¼ cup of paleo mayo (the creamy superstar)
- 1 egg yolk (the magic touch)
- ¼ teaspoon each of kosher salt and black pepper
- Optional ½ teaspoon of crushed red pepper flakes (for those who like a spicy adventure)
- Fresh basil and cracked pepper (because we believe in garnishing with flair)
How to Make It:
Ah, pasta lovers, we've heard your gluten-free pleas! Going gluten-free doesn't mean you have to wave goodbye to your favorite pasta dishes. No more feeling like you're missing out on a cozy, creamy bowl of comfort. Behold, our Creamy Gluten-Free Tomato Pasta, a dairy-free and gluten-free creation that's going to be your new pasta obsession.

Let's Embark on This Pasta Journey:

1. Grab a small pan and let's start sautéing! Heat up 1 tablespoon of olive oil, then toss in those diced onions and minced garlic. Sauté them until they release their fragrant goodness, which takes about 2 minutes. Once they're almost there, set them aside to add later.
2. Now, let's dive into the world of gluten-free pasta. In a large pot, cook your gluten-free pasta according to the package directions. Once they're perfectly al dente, drain, rinse, and return them to the pot. Keep the heat low; we're not done with these pasta beauties just yet.
3. Add in the remaining 2 tablespoons of olive oil and give those pasta gems a gentle toss. Mix until they're coated in that lovely olive oil.
4. In a separate bowl, work your magic by whisking together the paleo mayo and egg yolk. This is where the creamy enchantment begins. Pour this magical mix into your pot with the pasta, ensuring they're all cozied up and creamy. Don't forget to gently stir in the sautéed onion and garlic for that extra layer of flavor.
5. Let's get back to our saucy adventure! Toss in the canned Italian stewed tomatoes, and sprinkle in that kosher salt and black pepper. Give it all a gentle stir over low to medium-low heat until it's creamy and combined.
6. If you're in the mood for some protein, now's the time to add it in!
7. As our pasta masterpiece comes together, plate it up in your favorite bowls. Go ahead, be generous with those portions. Top it all off with fresh basil and a dash of cracked pepper.

And there you have it, a bowlful of creamy gluten-free pasta dreams! Enjoy your comforting, gluten-free feast. 🍝😋
Copyright 2020 - All Rights Reserved
FDA Compliance

The information on this website has not been evaluated by the Food & Drug Administration or any other medical body. We do not aim to diagnose, treat, cure or prevent any illness or disease. Information is shared for educational purposes only. You should always consult your doctor before acting on any content on this website, especially if you are pregnant, nursing, taking medication or have a medical condition.
Powered By ClickFunnels.com